
Showing posts with label clay. Show all posts
Showing posts with label clay. Show all posts
Wednesday, October 18, 2017
Fairview Studios Fall Pottery Sale!! - WE ARE MOVING LOCATIONS!!
The next Fairview Studios pottery sale will be on Sunday, November 26th from 10 - 2pm this year. Also note that we have had to change locations again (sorry about that). We made this decision after our costs for hall rentals almost doubled and in order to keep our pots affordable, we will now be located at the Kingsland Community Hall.

Wednesday, October 4, 2017
Up Next: Art Horizons Show

If you are in Calgary on Saturday, October 14th, you should consider coming to this show.
Tuesday, October 18, 2016
Fairview Studios 2016 Fall Pottery Sale
It's totally that time of year again. We all look forward to seeing you at our next studio sale!

Wednesday, August 10, 2016
Random
This picture is of one of my favorites from the soda kiln we fired at Medalta and it does not even come close to its amazingness in real life.
 When I got home from Medicine Hat I was exhausted, but the brain has been busy imagining new forms. This pitcher, although definately not a new shape in the world of ceramics, is for me. I have altered pots before but they always looked clumsy to me so I never really moved in that direction. I have given it a try again and I think I like it...
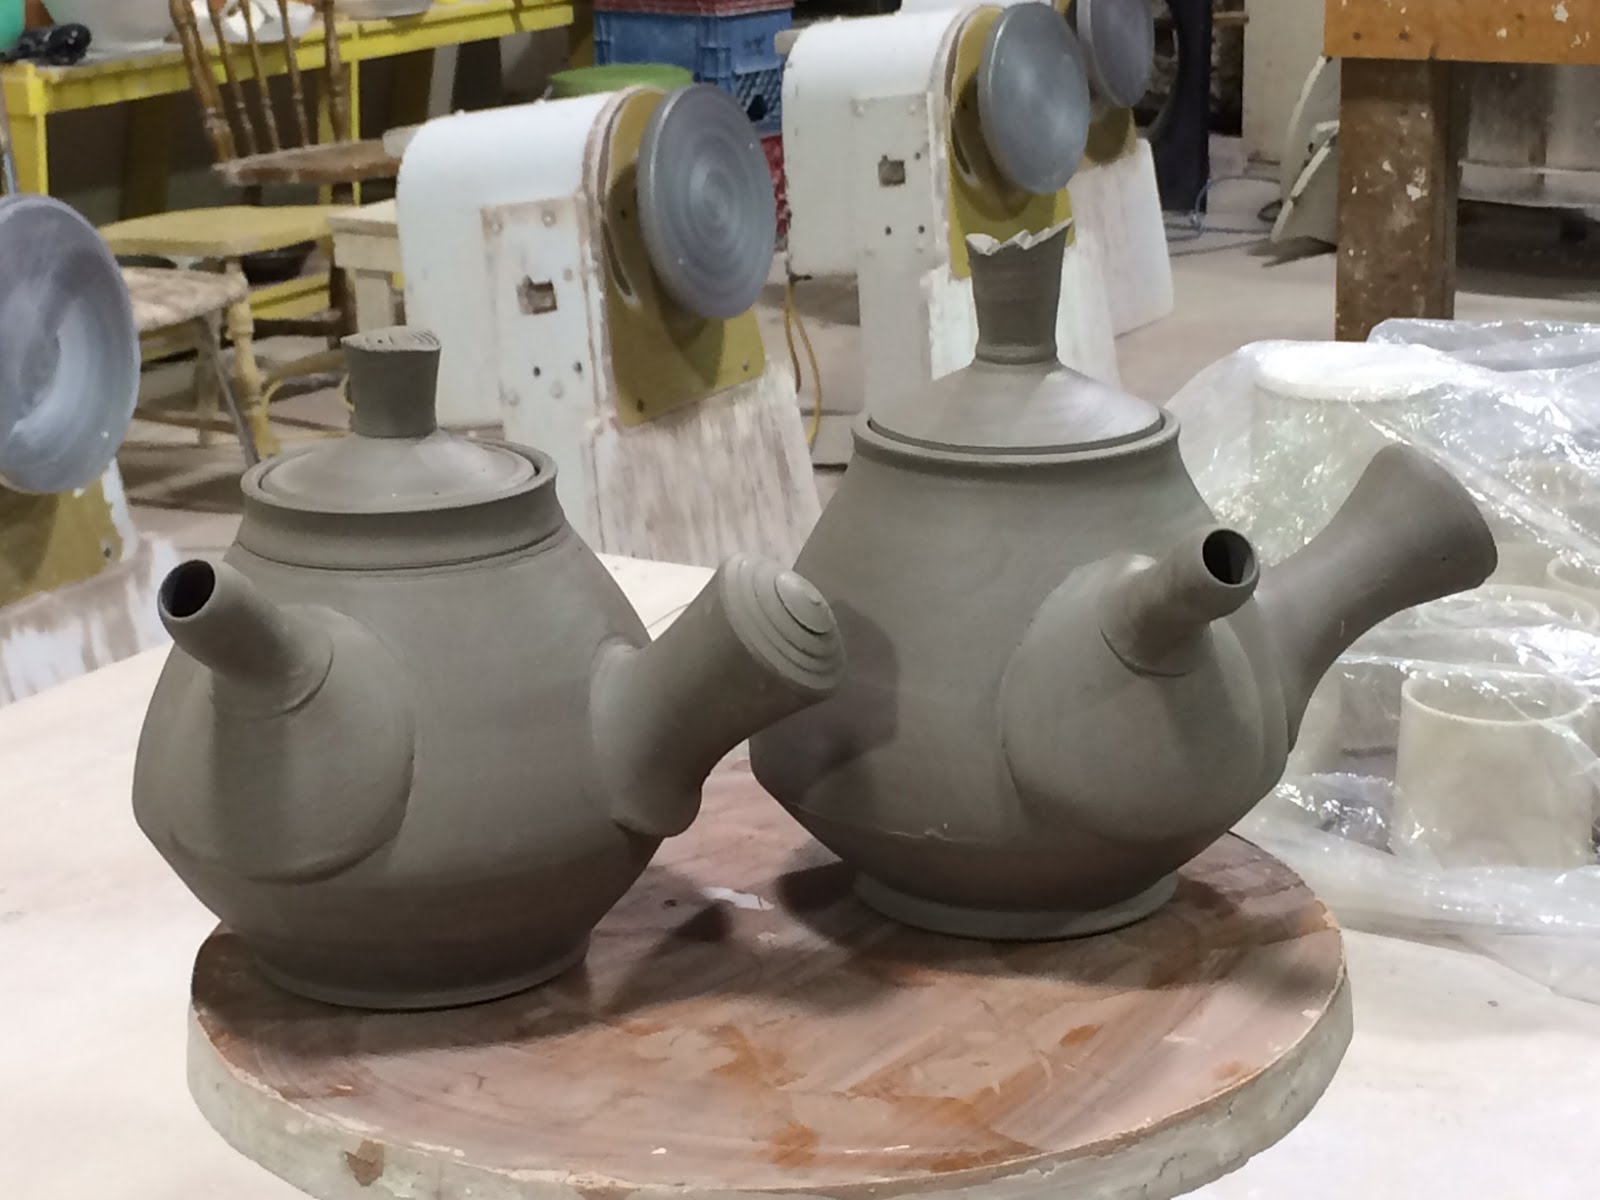
 These teapots are also a bit of a change in direction for me, and I have made a few more to potentially go into a couple of teapot shows coming up this fall.
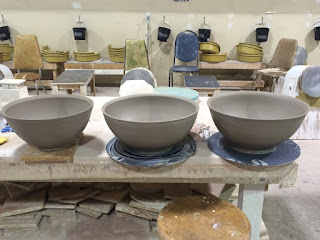
 Finally, I threw these large bowls on the weekend. I know the two on the right were thrown from 9lbs of clay, but I think the one on the left was from 6.5 or 7lbs.


Wednesday, July 27, 2016
Fun With Sodium Vapor and Other Fiery Tales
I was recently down in Medicine Hat for a 10 day atmospheric firing workshop with Robin Dupont. The goal of the workshop was to fire the salt, the soda and the wood kiln in those 10 days as well as make enough work (on top of what we initially brought with us) to fill them.
I left Calgary at about 2:30 pm after picking up one last box of clay. The trip was fairly uneventful, except for the dramatic prairie storm that was on the horizon. I was driving straight towards this huge, towering wall of storm cloud for about an hour and a half before I actually caught up to it, and then the highway veered off to the south and I essentially skirted the storm for most of the way, although I did get a bit wet. This shot is an attempt to capture the electric yellow canola fields against the stormy black backdrop.
 The workshop began on Friday and we were decorating and glazing pots right away to fill the salt kiln.
 Robin loading the salt kiln
 While the salt kiln was firing/cooling, we were all in the studio madly making more pots. That being said, I did take time out to just relax. I was outside the kiln pad when I saw this little guy. Not your regular hare, more a peter cotton tail bunny. It was quite young and there were a whole bunch of them all over the place, hanging out in the tomato patch, under piles of scrap wood, etc.
 After some debate as to schedule and when to fire, we began loading the wood kiln. We were pushed off schedule a bit because of a massive thunderstorm that knocked out the Blauww gas kiln that was full of our pots getting bisque fired, but a quick reset the next morning to finish the bisque had us back on track pretty quickly. We ended up having so much work that we ended up loading the salt again too.
This shot is of the throat arch chamber that is a "secret" chamber in between the firebox and the main chamber. The pots here will get a ton of heat and ash, so fingers crossed they come out ok.
After some debate as to schedule and when to fire, we began loading the wood kiln. We were pushed off schedule a bit because of a massive thunderstorm that knocked out the Blauww gas kiln that was full of our pots getting bisque fired, but a quick reset the next morning to finish the bisque had us back on track pretty quickly. We ended up having so much work that we ended up loading the salt again too.
This shot is of the throat arch chamber that is a "secret" chamber in between the firebox and the main chamber. The pots here will get a ton of heat and ash, so fingers crossed they come out ok.
 This is the main chamber and the pots here will get less ash deposited on them.
 This isn't the actual storm, but it was a precursor to the one that knocked the gas kiln out.
 Once the wood kiln was loaded, we fired it up at around 10 pm on Wednesday night. I was on stoking shift from midnight to 6am Thursday morning. This was a fairly easy shift, just keeping the fire going and spreading the coal bed around, making sure not to chuck wood into the pots that were about 2 feet away from the action.
 After that shift I went to bed for about 4 hours and came back to the studio to finish glazing pots for the soda and salt kilns and to start the loading process. Somewhere around 10pm it became apparent that there was a problem. We couldn't get anyone to do the midnight to 6am shift on Thursday night/Friday morning, but even though I had really only had 4 hours of sleep in the last 24 hours, I volunteered. That was actually fun. I was on shift with Michelle, a potter from Ft. McMurray. She chopped and split wood and I stoked. We were firing with cotton wood, not the easiest wood to fire with as it is a horrible wood to chop and it burns so fast you are constantly stuffing the firebox full of logs. I did get a really good feel for how that kiln fires. I was even able to tell by the sound it was making as to when temperature would start to climb, when it needed wood, when to fill the firebox etc. The heat was insane, and I lost about a gallon of sweat. When we were nearing our goal temperature, we began spraying in about 2 lbs of soda into the main chamber.
 I missed most of that morning and afternoon as I was sleeping, but I came back around 3 to witness the addition of the salt and soda. We were really concerned that the draw rings were not showing much glaze and so in an attempt to get a better read on what was going on, Robin decided to take a little cup off the bag wall that was able to fit through the port. I think we ended up adding another 3 or 4 lbs to the kiln. After we reached temp and we shut it off, Robin then perfomed a very slow cool down at around 1800F by keeping one burner on low to prevent the kiln from dropping in temperature too fast until it got to about 1400F (I'm working from memory here, so I might be off on my temps)
 These are a few results from the kilns:
Wood fired porcelain flask
These are a few results from the kilns:
Wood fired porcelain flask
 Wood fired stoneware pitcher fired in the secret chamber. It looks really crusty, and it is, but I have cleaned and scrubbed most of the crud off of it. I still need to grind a few chunky rough spots off and smooth the handle, but it should be pretty good.
 One of my favs. This cup came out of the soda kiln and is a really good example of what the slow cooling at the end achieved. It matted the surface and promoted crystal growth. In the sunlight, this surface is so amazing. There are rainbows of colour and the surface feels soft and silky. I had a few good pots out of the first salt, but only 2 cups made it into the 2nd salt and I guess I did not take any good pics of those pots, so we'll wait until I clean them up and get them ready to take to market.
 My drive back home:


Wednesday, June 29, 2016
Early Birthday Present To Me
I ordered this a while ago and it arrived at Ceramics Canada yesterday. It is a gas conversion kit that will turn a 10cu.ft electric kiln body into a propane fired kiln with the goal of firing it in either a soda or salt atmosphere. I'm guessing soda will be the end choice as salt pretty much melts soft fire brick, but I might opt to prepare the bricks with a refractory coating like ITC 100 and that should effectively prevent salt eating away the bricks.


Thursday, June 16, 2016
What was old is new again
I used to make fancy teapots. This was back when the studio had a 40 cu.ft. gas kiln where size was not as much of an issue as firing in a 10 cu.ft. electric kiln. When we moved studios and changed how we fire, I stopped making these whimsical pots. Now I am booked for a 10 day atmospheric firing workshop at Medalta in July and that was the perfect opportunity for me to bust out the ^10 clay and make these forms again. I am, hopefully, a better potter than I was 8 years ago and I have been far enough removed from the form for a while now that it is almost new for me and I hope I am making better decisions regarding the assembly and perhaps not as constrained by what I thought I knew, or what I thought was "the right way" to do things. So there may be a lot more whimsy to come...


Wednesday, May 25, 2016
Just a Peek
Last weekend was the May long weekend. As many silly people trekked out on the first camping weekend of the summer, I was ensconced in the studio mixing glazes and loading kilns. It turns out that I was the wisest one. It rained all weekend in town and snowed several feet in the mountains.
These are just a couple quick shots of the bisque kiln all loaded up and ready to fire and the resulting glaze kiln that I loaded on Monday. It was still at 650 F so I was only able to take a quick peek in to take the photo.


Tuesday, May 17, 2016
Are We There yet?
It has been a while since I have posted an actual post with anything worth saying. I've been busy, tired and burned out. That big fall show did me in. But now that spring has arrived on the prairies, I am feeling more and more energized to make new and interesting pots. The creative itch needs scratching, so it was a well timed e-mail from the Medalta events coordinator telling me about a couple of workshops that are coming up this summer. Robin Dupont is leading an atmospheric firing workshop with the focus on salt, soda and wood from July 14th to the 24th and I signed up for it that day. I have not been to Medalta to fire a kiln since July of 2013, so this is a perfect opportunity to spend more time down there that isn't spent frantically prepping and loading pots (my feet will thank me). In the past when I have been down there, I would arrive around noon on Thursday, glaze and load all that afternoon/evening and start the firing first thing Friday morning. That would usually only leave 1 day to "relax" on Saturday and then on Sunday the kilns would be unloaded and the kiln area cleaned up and I'd be out of there and back on the road to Calgary by noon. Ten whole days there with 24 hour studio access will be a treat. The only trick with taking a workshop of this length is accommodations. Medalta is currently working on building a place for visiting artists to stay, but for now, they have a network of people in Medicine Hat that rent rooms, or there are the local motels and hotels. I found a place to stay through a friend who has a relative in Medicine Hat and is willing to rent her basement for 10 days. It's close and cheap so not too much of an added burden. Once Medalta finishes the residences, it will be much easier and hopefully more affordable, to plan an extended stay down there.
So for now I will be making a few pots to put into the first firing down there. I have some Babu porcelain coming and from past experience, this body should work beautifully in the salt and soda kilns and is somewhat translucent if thin enough.
It has been so long since I have taken an actual holiday longer than 4 days, I might not know what to do with myself
If you want to sign up, here's the link:
http://medalta.org/atmospheric-firing-medalta
Wednesday, October 28, 2015
Fairview Pottery Sale - Fall 2015 - NEW LOCATION, NEW DAY, NEW TIME!!!
In case you were wondering, the sale info is below. Note that the location has changed, as has the day and time.

Little bowls are for the birds

Monday, October 19, 2015
Another new body
I picked up a new ^6 clay body on the weekend. It is black and it fires black, should be interresting.
It was a pleasure to throw, very smooth and very plastic. I was able to achieve height and width without much difficulty too. I guess it is not recommended for heating in the microwave as it contains black iron oxide. I guess I wont be making mugs out of it, but I did get a casserole, 6 coin banks, 1 large bowl and a pitcher thrown out of just over half a box. I will trim tomorrow night, we'll see how it goes.


Tuesday, October 13, 2015
Changing Seasons and Clay

This pitcher was thrown from the Mid White.There was a lot of trimming involved with this one to achieve both a pleasing shape as well as to make it usable. It still has some heft, but not nearly what it was.

Monday, July 27, 2015
Imperfection
Wow, it has been almost 2 months since my last post. My only excuse is that life got busy. I had another leak in my condo last week that was completely the fault of shoddy workmanship. the solder at the connection to the shower diverter starter leaking due to a plumber that just did not care enough. That was taken care of last week, but I spend most of it at my parent's house while the fans were blowing in my unit to dry out the wall and the floor. There is an area about 2x3 feet that has a bit of a bow in it. I am not sure if I should get this "fixed", as it is engineered hardwood that is all glued together. once you cut bits out of it, it ruins the integrity of the floor. I can only tell that the bow is there because I know that there was a leak and where to look for it...
Now, as for pottery, it has been so warm and muggy here in Calgary that the thought of throwing anything while kilns are cooling and the temp outside has been 28 plus degrees, has been less than tempting. I went in yesterday to get a few things done though. It was much cooler and way less sweaty.
I began with mugs and then moved on to a few bowls. These were poked and prodded into submission by a couple of new texture ribs and bits of a mug that did not survive. I just pulled wads off the lump of dead mug and stuck them on the textured bowl. They are not my normal, that's for sure. I love texture, I am just not good at that spontaneous, fresh look. I need to practice a bit more for them to just spring forth without much prodding.


Monday, June 8, 2015
All carved up
Now that I have committed myself financially to the festival of crafts in the fall, I need to commit mentally and physically. I began my weekend on Friday afternoon by throwing a few mugs, trimming what needed trimming and carving a few mugs.
I worked one of the last few Saturdays left before the summer at Ceramics Canada so I was only able to finish off the last few mugs that were to be carved that afternoon. Sunday however was the day to throw and carve en mass. I made mugs and casseroles, and carved a ton of ramekins. OK, only 7 ramekins, but they take about 20 minutes each to carve, not counting the time to slip them up with black terra sig. It is amazing how much does NOT get done in the studio though, even when I have a list of TO DO's. I usually arrive at 9am on Sundays and am generally there until at least 2pm, although this Sunday I was there until 4:30 ish. I only managed to throw 7 mugs and 2 casseroles, I think I will need to step up the production rate if I am going to have enough to fill my shelves. This will mean less talking I think. The sale may be over 5 months away, but I will need to get the majority of my stock made and glazed this summer so I don't run into any snags getting things fired in the fall. The student sale takes priority at the studio, so my firings will need to be worked in and around the student work.
This image is just a sampling of what I have been working on. I have changed my mug shape a wee bit, and the handles are way more substantial. The designs are different, yet similar to the ones in the past. I have to find a good pattern or 2 that is simple to lay out and carve, yet still engaging to the eye. The time it takes to carve some of them is way too long, especially if I actually want to make a profit or even break even on this. I should note that these are all free hand, no actual pattern is used, it all comes out of my brain. Sometimes it works, and sometimes it does not. The top right hand mug for instance is not really working for me in terms of the pattern, I do like the bottom 2 though.
 I will finally be able to spend more time in the studio as of July 4th. Ceramics Canada does not open on the weekends during the summer, so I should be able to put some long hours in over those 9 hot, sweaty weeks.
This image is just a sampling of what I have been working on. I have changed my mug shape a wee bit, and the handles are way more substantial. The designs are different, yet similar to the ones in the past. I have to find a good pattern or 2 that is simple to lay out and carve, yet still engaging to the eye. The time it takes to carve some of them is way too long, especially if I actually want to make a profit or even break even on this. I should note that these are all free hand, no actual pattern is used, it all comes out of my brain. Sometimes it works, and sometimes it does not. The top right hand mug for instance is not really working for me in terms of the pattern, I do like the bottom 2 though.

Friday, June 5, 2015
UH OH...What Have I Done?!?
The title sounds a bit ominous, but in reality, it is just my inner doubter/critic in me.
I have news and it is probably good!
I have been accepted into and I have just signed the contract and paid the first installment for ......the 2015 Festival of Crafts at the BMO Centre in Calgary.
This is a very daunting challenge I have set myself. I need to make, make, make until my fingers fall off and run away, tie a grindstone to my head, etc. I have 5 months and a bit to make and carve all the pots I can possibly make before this show.
Have I gotten myself in too deep? Who knows, I sure don't, and I wont know until it is too late anyway, so I am just going to jump head first into the deep end and hope there are no hidden rocks or sharks under the surface. Other people do these things, so I should be able to too, right?
I think the only other thing I need to do besides make lots of pots is to get myself liability insurance. I'm fairly certain that my booth will be injury free, but you never know, someone could pull my display shelves down and die from a thousand small cuts from all the broken pottery...
Wish me luck, I think I will need it.
Tuesday, June 2, 2015
Catching up
The Fairview Studios Spring Pottery sale is over for another year and it looks like we may be in for a change of venue for the next fall sale, so stay tuned for more info to come shortly.
Anyway, now that the craziness of the sale is over, I can concentrate on pots.
As you can see, I have been up to a whole lot of carving and scratching, and there is more than what you see here. I have even been messing around with slip inlay, or mishima as well as making a whole load of large bowls and platters. Finally, mug handles. They have always been the bane of my existence. I used to hate making them, but not so much now. I am however, always on the search for that "perfect" handle. I think I like these ones. they are substantial, you can't mistake them for anything else. I think Mick Casson said something about how your handles should always make themselves known. That they shouldn't be an afterthought. I agree that wimpy handles that just hang onto the pot like a piece of lint are horrible. Handles should be HANDLES and as that is probably the area that most hands will touch and feel, a well made handle is almost priceless. I love a pulled handle the best, to me they feel like they belong in the hand. Sharp edges are not my thing, thin strappy handles are not my thing, but a lovely pulled handle is something else. I could hold a mug and stroke the handle all day long until I could identify it blindfolded.


Wednesday, May 13, 2015
Inside the Garbage Can
I think this picture pretty much says it all. The glaze ran and ran and ran...


Tuesday, April 21, 2015
Take it to the bank


I posted some banks that I was in the process of making a little while ago, but then did not get the finished result posted. Here is one bird bank and the octopi bank that I made for my nephew. The rest will follow as I get them glazed and photographed.
Subscribe to:
Posts (Atom)